
Quick start
Get your first agent live in under 5 minutes:Configure prompt and timezone
Write your system prompt. Add local timezone context if you want real-time temporal awareness.
Select model, voice, and accent
Choose your AI model. Select a voice and a preferred accent. Adjust the emotional tone of the agent.
Creating a new agent
The agent builder features a simplified, unified workspace. You manage the system prompt on the left side. You configure technical settings on the right side.
AI provider settings
Configure the reasoning engine. Define the personality of the voice:- Model: Select Agni Premium for high-fidelity reasoning and complex conversations. Alternatively, select Agni Lite for a budget-friendly option with faster response times.

- Voice & accent: Choose from our library of voices. You can apply a Voice Accent to match local regional preferences. For example, select US Southern to make your agent match a southern US accent. You can also customize the emotional expressiveness with Emotion settings to make interactions sound more human.

Prompt and timezone
Write the guidelines for your agent in the prompt editor. You can also configure the Timezone field:- Timezone: Enable this field to give the agent real-time awareness for a specific area. This option adds a context line directly to the start of your prompt. You must enable it if you want the agent to reference the correct local time during calls.
Welcome message
Under the Welcome Message tab, decide how the interaction starts. If the agent speaks first, you can choose a static custom message. Alternatively, select a Dynamic message based on prompt to let the agent tailor the greeting to the call context.
Agent configuration
Functions & tools
Equip your agent with the ability to take action during a call.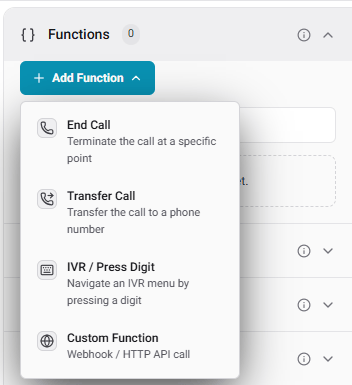
- IVR / Press Digit: Navigate automated phone menus. You can set the Pause Detection Delay to ensure the agent waits before pressing a digit.
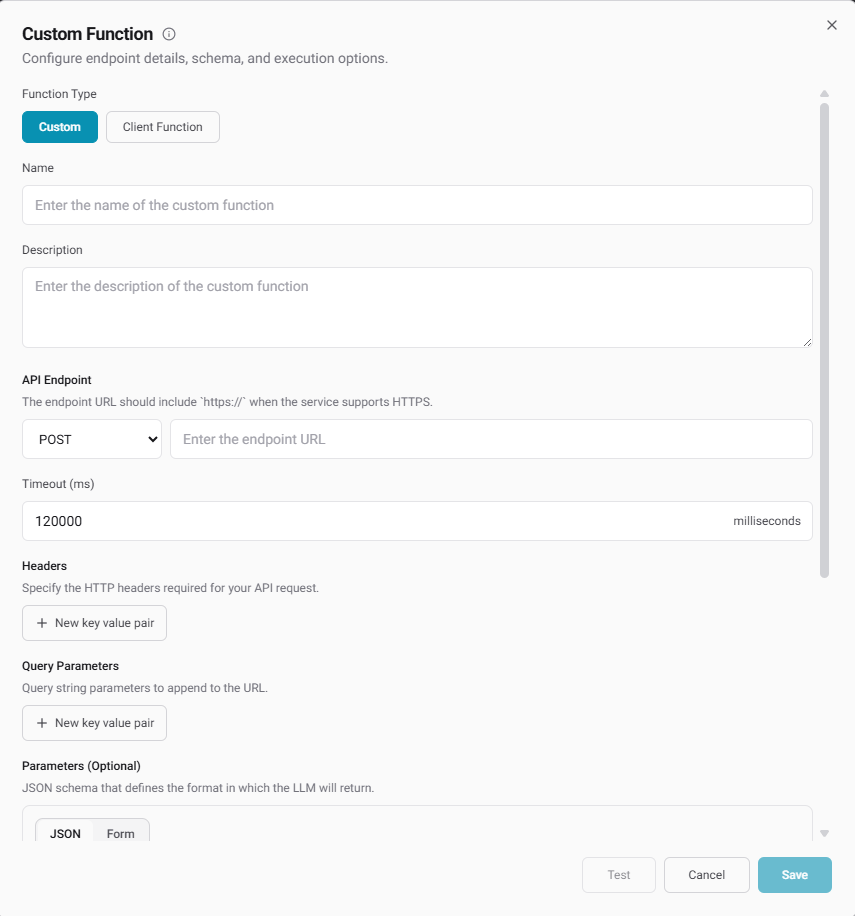
- Custom Functions: Connect your backend system.
- Custom (Server-Side): Configure direct API calls with custom headers and JSON schemas.
- Client Function: Define parameters that the model returns to your local application.
Specialized settings
Speech & speech settings
Speech & speech settings
Fine-tune the audio environment. Add Background Sounds like an office hum or traffic noise. You can adjust the Interruption Sensitivity. Configure Reminder Messages for silent periods.
Call & memory settings
Call & memory settings
Control telephony rules like Voicemail Detection, Max Duration, and Emergency fallback.
- Emergency fallback: Specify a backup phone number. If the AI agent encounters a critical failure (such as an LLM provider outage, severe latency, or an unexpected server error), the call will automatically transfer to this fallback number. This ensures your customers always reach a human when things go wrong instead of being hung up on.
- Memory: Enable Memory to let the agent remember past conversations with returning callers. Note: Memory works strictly on inbound and outbound calls. It is not supported on web calls.
Post-call data extraction
Post-call data extraction
Define what data to extract from the transcript. You can capture sentiments and generate summaries. You can also pull custom structured JSON.
Knowledge base
Knowledge base
Link a knowledge base to let your agent answer questions using your company documentation.
Testing your agent
The built-in testing environment allows you to test your agent safely before deployment.
Test modalities
- Web Call: Talk to your agent directly through your browser. In the Metadata section, click Add to enter metadata as key-value pairs for testing dynamic prompt variables.
Using dynamic variables: To set up dynamic variables, include them in your prompt using double curly braces (for example,
{{user_name}}). New input fields will automatically appear in your testing panel to let you pass test values.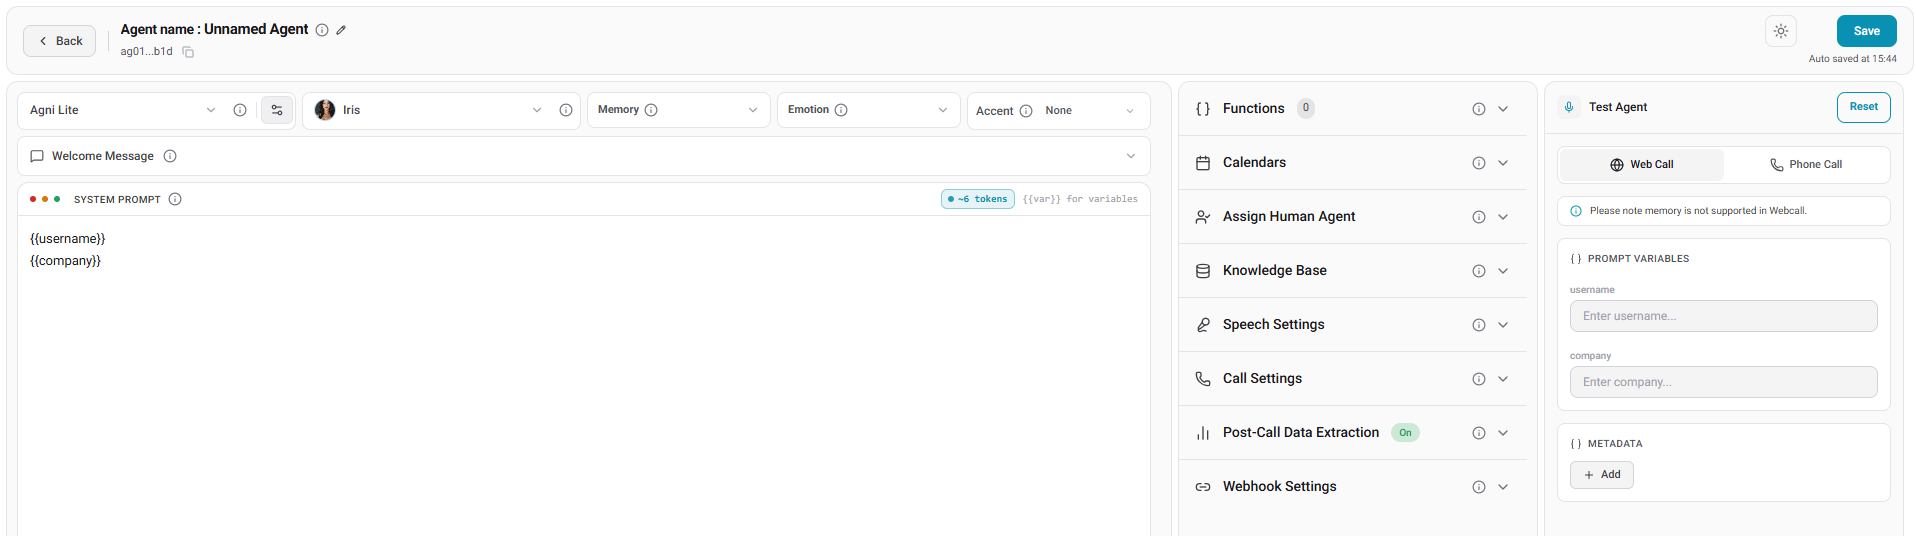
- Phone Call: Enter your phone number to receive a live call from the agent. This allows you to experience agent behavior over a real cellular network.
API Reference
This section documents the HTTP API for managing agents.Endpoints
- List agents:
GET /api/v1/agents - Get agent:
GET /api/v1/agents/{id} - Create agent:
POST /api/v1/agents - Update agent:
PATCH /api/v1/agents/{id} - Update status:
PATCH /api/v1/agents/{id}/status - Delete agent:
DELETE /api/v1/agents/{id} - Disconnect Cal.com:
POST /api/v1/agents/{id}/disconnect-calcom - Disconnect tools:
POST /api/v1/agents/{agent_id}/disconnect-tools
Examples
List agents Request:List agent response fields
| Field | Type | Description |
|---|---|---|
success | boolean | Whether the request completed successfully. |
message | string | Human-readable API message. |
data | array | List of agent objects. |
meta | object | Pagination metadata. |
| Field | Type | Description |
|---|---|---|
id | string | Unique agent ID. |
organizationId | string | Organization ID that owns the agent. |
agentName | string | Agent display name. |
status | string | Agent status, for example ACTIVE. |
model | string | Primary model used by the agent. |
s2sModel | string | Speech-to-speech model used by the agent. |
voiceId | string | Selected voice name or ID. |
temperature | number | Model temperature. |
reminderTriggerMs | number | Silence duration before a reminder is triggered, in milliseconds. |
reminderMaxCount | number | Maximum reminder attempts during silence. |
ambientSound | string | Background sound preset. |
ambientSoundVolume | number | Background sound volume. |
maxCallDurationMs | number | Maximum call duration in milliseconds. |
ringDurationMs | number | Maximum ringing duration in milliseconds. |
voicemailMessage | string | Message used when voicemail is detected. |
voicemailDetectionTimeoutMs | number | Voicemail detection timeout in milliseconds. |
postCallAnalysisModel | string | Model used for post-call analysis. |
postCallAnalysisData | array | Structured fields extracted after a call. |
selectedTools | array or null | Tool IDs selected for the agent. |
knowledgeBase | string | Linked knowledge base ID, or an empty string when not configured. |
beginMessage | string | Opening message for the agent. |
startSpeaker | string | Speaker that starts the call, for example agent. |
createdAt | string | Agent creation timestamp. |
updatedAt | string | Agent update timestamp. |
webhookUrls | array | Webhook URLs called for agent events or data sync. |
ghlCalendarId | string | GoHighLevel calendar ID. |
calcomCalendarId | string | Cal.com calendar ID. |
prompt | string | Agent system prompt. |
endcallOnSilenceDuration | number | Silence duration before ending the call, in milliseconds. |
reminderMessage | string | Reminder message spoken during silence. |
voicemailCustomPatterns | array or null | Custom voicemail detection patterns. |
interruptionSensitivity | number | Sensitivity for user interruptions. |
calcomApiKey | string | Cal.com API key configured for the agent. |
calcomApiUrl | string | Cal.com API base URL. |
campaignStats | object | Campaign performance stats. Present only when campaign data is available. |
callStats | object | Call performance stats. |
calcomAccountName | string | Connected Cal.com account name. |
calcomStatus | string | Cal.com connection status. |
calcomConnectionType | string | Cal.com connection owner type. |
ghlAssignUserIdList | array | GoHighLevel user IDs assigned to the agent. |
memory | boolean | Whether agent memory is enabled. |
calendarTimezone | string | Calendar timezone used for scheduling. |
accent | array | Selected voice accent values. |
emotion | boolean | Whether emotional voice behavior is enabled. |
crmSyncProviders | array or null | CRM sync providers configured for the agent. |
salesforceCalendarId | string | Salesforce calendar ID. |
salesforceAssignUserIdList | array | Salesforce user IDs assigned to the agent. |
emergencyFallback | string | Fallback phone number used during critical failures. |
| Field | Type | Description |
|---|---|---|
name | string | Extracted field name. |
type | string | Field type, for example string or enum. |
description | string | Instructions for extracting this field. |
choices | array | Allowed values for enum fields. Present when type is enum. |
| Field | Type | Description |
|---|---|---|
totalCalls | number | Total calls handled by the agent. |
inboundCalls | number | Inbound call count. |
outboundCalls | number | Outbound call count. |
webCalls | number | Web call count. |
totalDurationSec | number | Total call duration in seconds. |
avgDurationSec | number | Average call duration in seconds. |
totalCost | number | Total call cost. |
lastCallAt | string | Timestamp of the latest call. |
completedCalls | number | Completed call count. |
failedCalls | number | Failed call count. |
noAnswerCalls | number | No-answer call count. |
busyCalls | number | Busy call count. |
avgLatencyMs | number | Average latency in milliseconds. |
| Field | Type | Description |
|---|---|---|
totalCampaigns | number | Total campaigns linked to the agent. |
totalContacts | number | Total contacts across campaigns. |
contacted | number | Contacts already contacted. |
successful | number | Successful campaign calls. |
failed | number | Failed campaign calls. |
noAnswer | number | Campaign calls with no answer. |
pending | number | Contacts pending outreach. |
inProgress | number | Campaign calls currently in progress. |
| Field | Type | Description |
|---|---|---|
total | string or number | Total matching agents. |
limit | number | Page size used for the request. |
offset | number | Pagination offset used for the request. |
200 OK with empty body {}
Disconnect Cal.com
Request:
{}
Disconnect tools
Request:
Tools API
Manage reusable tools (org-level or agent-scoped) used by agents.Endpoints
- List tools:
GET /api/v1/tools - Get tool:
GET /api/v1/tools/{id} - Create tool:
POST /api/v1/tools - Update tool:
PATCH /api/v1/tools/{id} - Delete tool:
DELETE /api/v1/tools/{id} - Duplicate tool:
POST /api/v1/tools/{id}/duplicate - Toggle tool:
PATCH /api/v1/tools/{id}/toggle - Bulk-remove from agent:
DELETE /api/v1/agents/{agent_id}/tools
AgentTool example shape:
Examples
List tools (optionally scoped to an agent) Request:200 OK with empty body {}
Duplicate tool
Request:
200 OK with empty body {}